使用 Spring MVC 构建应用程序
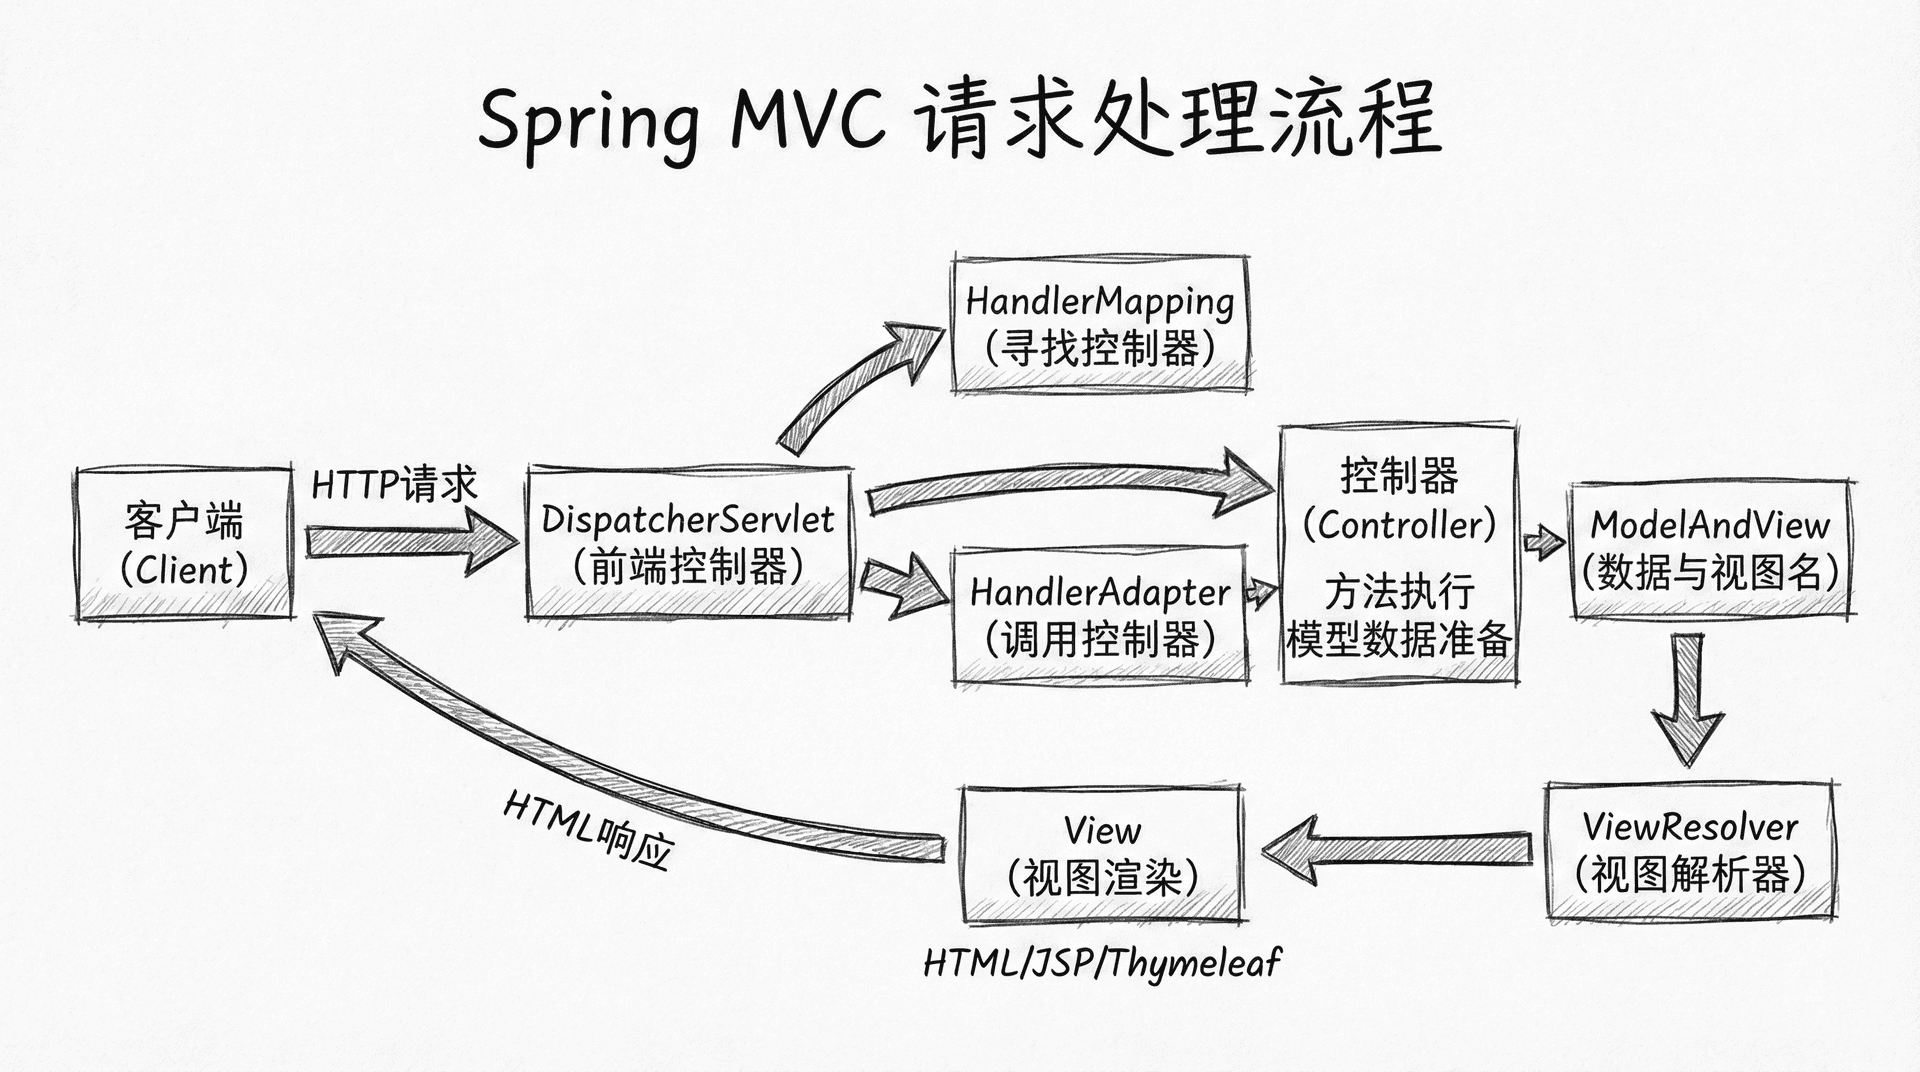
在前面的课程中,我们主要关注的是REST API的开发,这些API返回的是JSON格式的数据,供前端应用或其他服务调用。然而,在实际项目中,你往往还需要构建传统的Web应用,这些应用需要渲染HTML页面、处理表单提交、管理用户会话等。Spring MVC是Spring框架中用于构建Web应用的核心模块,它提供了完整的MVC(Model-View-Controller)架构支持,让你能够构建功能丰富的Web应用程序。
Spring MVC不仅仅是一个简单的Web框架,它提供了一套完整的Web开发解决方案,包括请求映射、参数绑定、视图解析、异常处理、拦截器、内容协商等功能。通过Spring Boot的自动配置,这些功能都能够开箱即用,你只需要添加相应的依赖和配置,就能快速构建出功能完整的Web应用。
这节课我们将深入学习如何使用Spring MVC构建Web应用程序,包括视图技术的使用、表单处理、文件上传、内容协商、拦截器、异常处理、国际化等内容。通过这些知识的学习,你将能够构建出既支持REST API又支持传统Web页面的完整应用。
添加Thymeleaf模板引擎依赖
虽然Spring MVC支持多种视图技术,但Thymeleaf是Spring Boot官方推荐的选择,它提供了强大的模板功能,能够生成动态HTML页面。Thymeleaf的语法自然、易于学习,模板文件本身就是有效的HTML,可以在浏览器中直接预览,这大大提高了开发效率。
在pom.xml文件中添加Thymeleaf依赖:
xml
<dependency>
    <groupId>org.springframework.boot</groupId>
    <artifactId>spring-boot-starter-thymeleaf</artifactId>
</dependency>
添加完依赖后,刷新Maven项目。Spring Boot会自动配置Thymeleaf,默认的模板文件位置是src/main/resources/templates,模板文件的后缀是.html。你不需要编写任何配置代码,就能开始使用Thymeleaf。
创建第一个Thymeleaf视图
让我们创建一个简单的课程列表页面来演示Thymeleaf的基本用法。在src/main/resources/templates目录下创建courses.html文件。在IDE中,展开src/main/resources目录,如果templates目录不存在,就右键点击resources目录,选择新建文件夹,输入templates并确认。然后在templates目录上右键,选择新建文件,输入文件名courses.html,IDE会创建这个文件。打开文件,将内容替换为:
html
<!DOCTYPE html>
<html xmlns:th="http://www.thymeleaf.org">
<head>
    <meta charset="UTF-8">
    <title>课程列表</title>
    <style>
        body {
            font-family: Arial, sans-serif;
            max-width: 1200px;
            margin: 0
这个模板文件使用了Thymeleaf的标准语法。xmlns:th="http://www.thymeleaf.org"声明了Thymeleaf命名空间,让你能够在HTML属性中使用th:前缀。th:each="course : ${courses}"实现了循环遍历,${courses}是从控制器传递过来的模型数据。th:text="${course.id}"用于显示课程ID,如果模型数据不存在,会显示标签内的默认文本(如"1"),这样模板文件本身就是有效的HTML,可以在浏览器中直接打开预览。
${#temporals.format(course.createdAt, 'yyyy-MM-dd HH:mm')}使用了Thymeleaf的工具对象#temporals来格式化日期时间。Thymeleaf提供了丰富的工具对象,包括字符串处理、日期格式化、集合操作等,这些工具对象让模板编写更加便捷。
创建返回视图的控制器
现在我们需要创建一个控制器来处理页面请求并返回视图。在src/main/java/com/example/myapp/my_spring_boot_app/controller包下创建CourseViewController.java文件。在IDE中,找到controller包,右键点击,选择新建Java类,输入类名CourseViewController,然后将内容替换为:
java
package com.example.myapp.my_spring_boot_app.controller;

import com.example.myapp.my_spring_boot_app.model.Course;
import com.example.myapp.my_spring_boot_app.service.CourseService;
import org.springframework.stereotype.Controller;
import org.springframework.ui.Model;
import org.springframework.web.bind.annotation.GetMapping;
import org.springframework.web.bind.annotation.RequestMapping;

import java.util.List;

@Controller
@RequestMapping("/courses")
public class CourseViewController {

    private final CourseService courseService;

    public
这个控制器与之前的REST控制器有几个关键区别。@Controller注解替代了@RestController,表示这是一个返回视图的控制器。Model参数用于向视图传递数据,通过model.addAttribute("courses", courses)将课程列表添加到模型中,视图可以通过${courses}访问这些数据。方法返回字符串"courses",这表示视图名称,Spring MVC会根据配置的视图解析器将其解析为templates/courses.html文件。
启动应用后,访问http://localhost:8080/courses,你应该能看到课程列表页面。这个页面会从数据库读取所有课程并显示在表格中。
处理表单提交
Web应用的核心功能之一是处理表单提交,让用户能够通过表单创建或更新数据。让我们创建一个课程创建表单页面。在src/main/resources/templates目录下创建course-form.html文件:
html
<!DOCTYPE html>
<html xmlns:th="http://www.thymeleaf.org">
<head>
    <meta charset="UTF-8">
    <title th:text="${course != null ? '编辑课程' : '创建课程'}">创建课程</title>
    <style>
        body {
            font-family: Arial, sans-serif;
            max-width:
这个表单使用了Thymeleaf的表单绑定功能。th:object="${course != null ? course : courseForm}"绑定了表单对象,th:field="*{title}"实现了字段绑定,*{title}是选择表达式,表示当前对象的title属性。th:if="${#fields.hasErrors('title')}"用于条件显示,只有当title字段有验证错误时才显示错误消息。th:errors="*{title}"显示字段的验证错误消息。
表单的提交地址和HTTP方法根据是创建还是编辑动态设置。对于编辑操作,我们使用隐藏字段_method来模拟PUT请求,因为HTML表单只支持GET和POST方法。
在控制器中添加处理表单的方法:
java
@GetMapping("/new")
public String showCreateForm(Model model) {
    model.addAttribute("courseForm", new Course());
    return "course-form";
}

@PostMapping
public String createCourse(@Valid @ModelAttribute("courseForm") Course course,
                          BindingResult bindingResult,
                          Model model) {
    if (bindingResult.
@ModelAttribute("courseForm")将表单数据绑定到Course对象,@Valid启用Bean Validation验证。BindingResult参数用于接收验证结果,如果验证失败,bindingResult.hasErrors()会返回true,此时返回表单页面让用户修正错误。redirect:/courses实现重定向,创建或更新成功后跳转到课程列表页面。
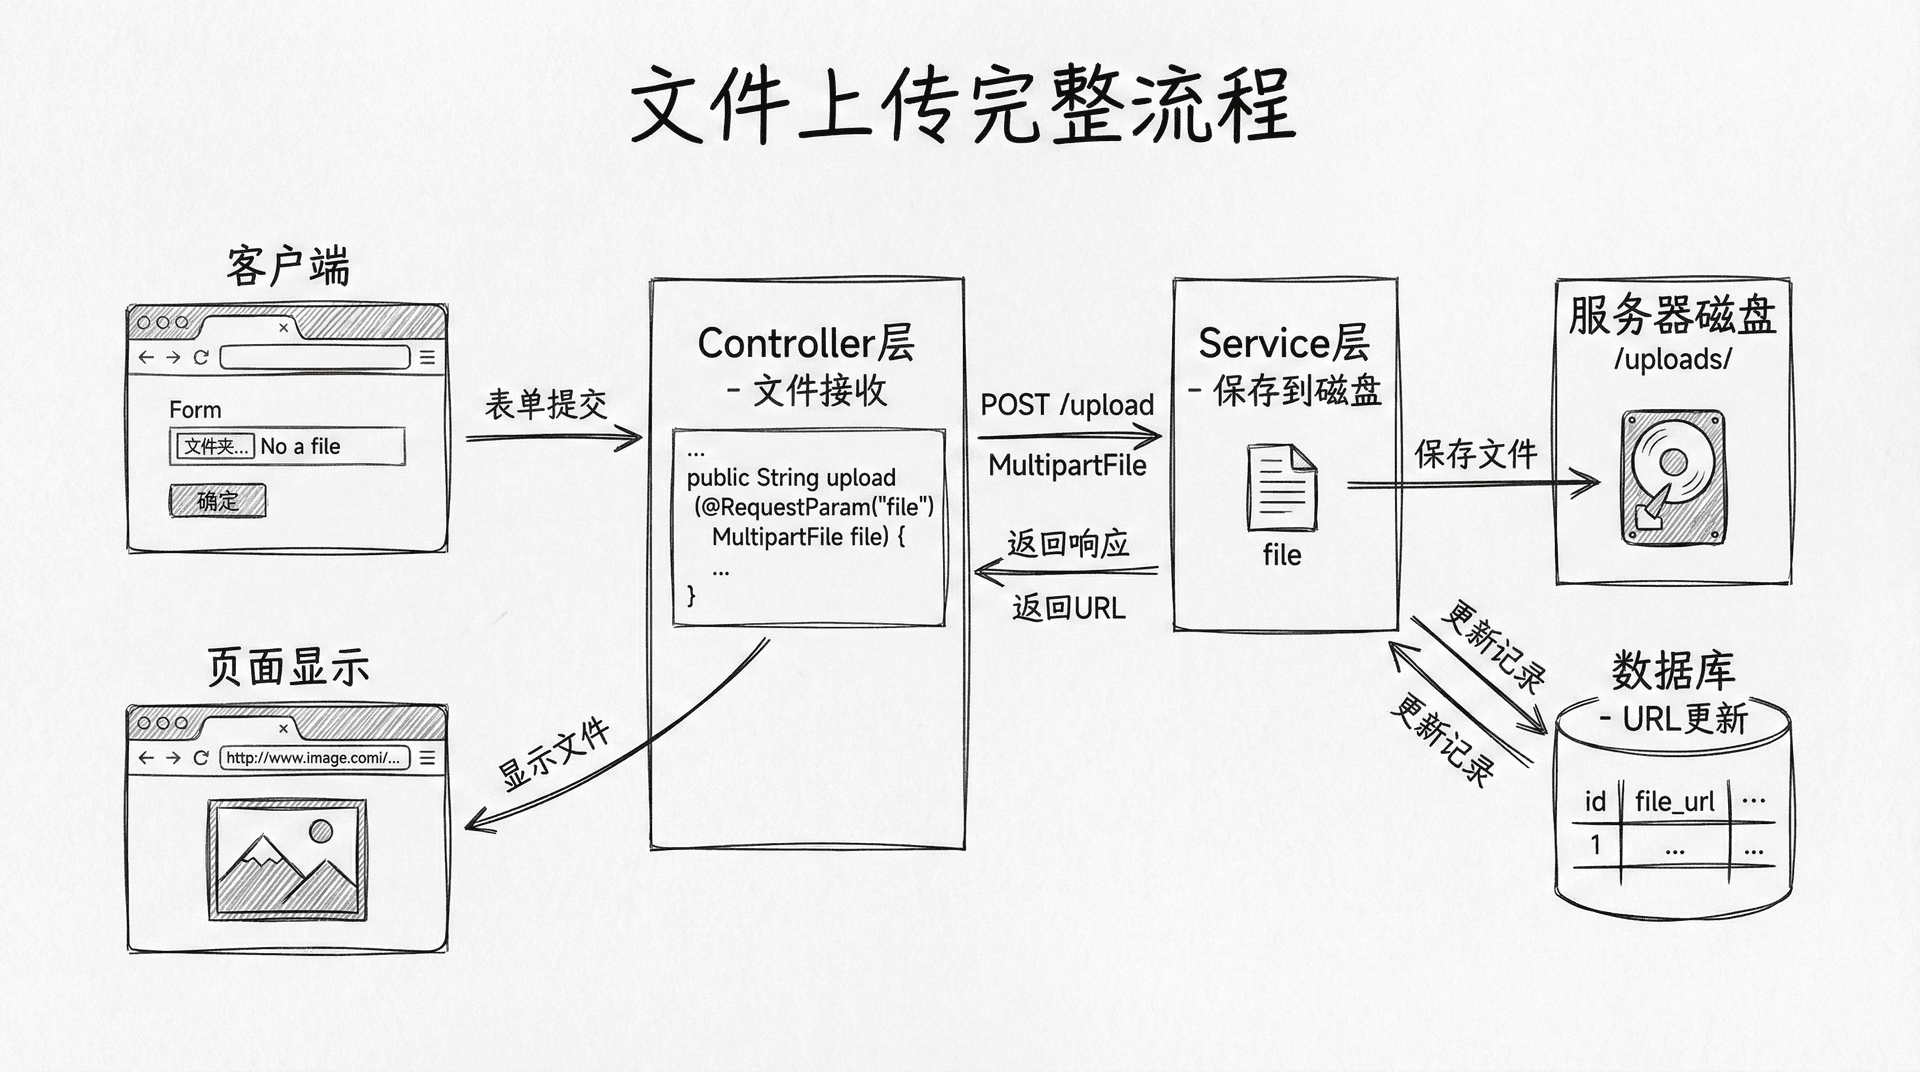
实现文件上传功能
文件上传是Web应用中的常见需求,Spring MVC提供了强大的文件上传支持。让我们为课程添加封面图片上传功能。在pom.xml中添加文件上传依赖(实际上spring-boot-starter-web已经包含了文件上传支持,但为了明确,我们可以添加Apache Commons FileUpload):
首先更新Course实体,添加封面图片字段:
java
private String coverImageUrl;在src/main/resources/application.properties中添加文件上传配置:
properties
spring.servlet.multipart.enabled=true
spring.servlet.multipart.max-file-size=10MB
spring.servlet.multipart.max-request-size=10MB
spring.servlet.multipart.file-size-threshold=2KB
在控制器中添加文件上传处理方法:
java
@PostMapping("/{id}/upload")
public String uploadCoverImage(@PathVariable Long id,
                               @RequestParam("file") MultipartFile file,
                               RedirectAttributes redirectAttributes) {
    if (file.isEmpty()) {
        redirectAttributes.addFlashAttribute("error", "请选择要上传的文件");
        return "redirect:/courses/" + id + "/edit";
    }
@RequestParam("file")绑定上传的文件,MultipartFile接口提供了访问文件内容的方法。Files.createDirectories(uploadPath)创建上传目录,Files.copy()将文件保存到磁盘。RedirectAttributes用于在重定向时传递消息,addFlashAttribute添加的消息会在重定向后的页面中显示一次后自动清除。
在表单中添加文件上传字段:
html
<div class="form-group">
    <label for="coverImage">封面图片</label>
    <input type="file" id="coverImage" name="file" accept="image/*"/>
    <form th:action="@{/courses/{id}/upload(id=${course.id})}" method="post" enctype="multipart/form-data" style=
enctype="multipart/form-data"是文件上传表单必需的属性,它告诉浏览器以二进制格式发送文件数据。
实现内容协商
内容协商允许同一个控制器方法根据客户端的请求返回不同格式的响应。例如,浏览器请求返回HTML页面,API客户端请求返回JSON数据。Spring MVC通过ContentNegotiationManager来实现这个功能。
创建一个同时支持HTML和JSON的控制器方法:
java
@GetMapping(value = "/{id}", produces = {MediaType.TEXT_HTML_VALUE, MediaType.APPLICATION_JSON_VALUE})
public Object getCourse(@PathVariable Long id, HttpServletRequest request) {
    Course course = courseService.getCourseOrThrow(id);

    String acceptHeader = request.getHeader("Accept");
    if (acceptHeader != null && acceptHeader.contains("application/json")) {
这个方法根据请求的Accept头来决定返回格式。如果客户端请求JSON格式(Accept: application/json),就返回Course对象,Spring会自动将其序列化为JSON。如果请求HTML格式,就返回ModelAndView对象,Spring会渲染对应的视图。
更优雅的方式是使用@ResponseBody和条件注解:
java
@GetMapping("/{id}")
public ModelAndView getCourseView(@PathVariable Long id) {
    Course course = courseService.getCourseOrThrow(id);
    ModelAndView modelAndView = new ModelAndView("course-detail");
    modelAndView.addObject("course", course);
    return modelAndView;
}

@GetMapping(value = "/{id}", produces
Spring MVC会根据请求的Accept头自动选择匹配的方法。当Accept头包含application/json时,会调用返回JSON的方法;否则调用返回视图的方法。
使用拦截器实现横切关注点
拦截器是Spring MVC提供的强大功能,它允许你在请求处理的前后执行自定义逻辑,实现横切关注点,如日志记录、权限检查、性能监控等。拦截器不会侵入业务代码,让你能够以声明式的方式添加通用功能。
创建一个日志拦截器。在src/main/java/com/example/myapp/my_spring_boot_app/config包下创建LoggingInterceptor.java文件:
java
package com.example.myapp.my_spring_boot_app.config;

import jakarta.servlet.http.HttpServletRequest;
import jakarta.servlet.http.HttpServletResponse;
import org.slf4j.Logger;
import org.slf4j.LoggerFactory;
import org.springframework.stereotype.Component;
import org.springframework.web.servlet.HandlerInterceptor;
import org.springframework.web.servlet.ModelAndView;

@Component
public class LoggingInterceptor implements HandlerInterceptor {

    private static final Logger logger = LoggerFactory.getLogger(LoggingInterceptor.class);
HandlerInterceptor接口定义了三个方法:preHandle在控制器方法执行前调用,返回true继续处理,返回false中断处理。postHandle在控制器方法执行后、视图渲染前调用。afterCompletion在整个请求处理完成后调用,无论成功还是异常都会执行。
注册拦截器需要创建一个配置类。在config包下创建WebMvcConfig.java文件:
java
package com.example.myapp.my_spring_boot_app.config;

import org.springframework.beans.factory.annotation.Autowired;
import org.springframework.context.annotation.Configuration;
import org.springframework.web.servlet.config.annotation.InterceptorRegistry;
import org.springframework.web.servlet.config.annotation.WebMvcConfigurer;

@Configuration
public class WebMvcConfig implements WebMvcConfigurer {

    @Autowired
    private LoggingInterceptor loggingInterceptor;

    @Override
    public void addInterceptors(InterceptorRegistry registry) {
        registry.
WebMvcConfigurer接口提供了配置Spring MVC的方法,addInterceptors用于注册拦截器。addPathPatterns指定拦截的路径模式,excludePathPatterns指定排除的路径模式。这个配置会让拦截器拦截所有/courses/**路径的请求,但排除/courses/api/**路径。
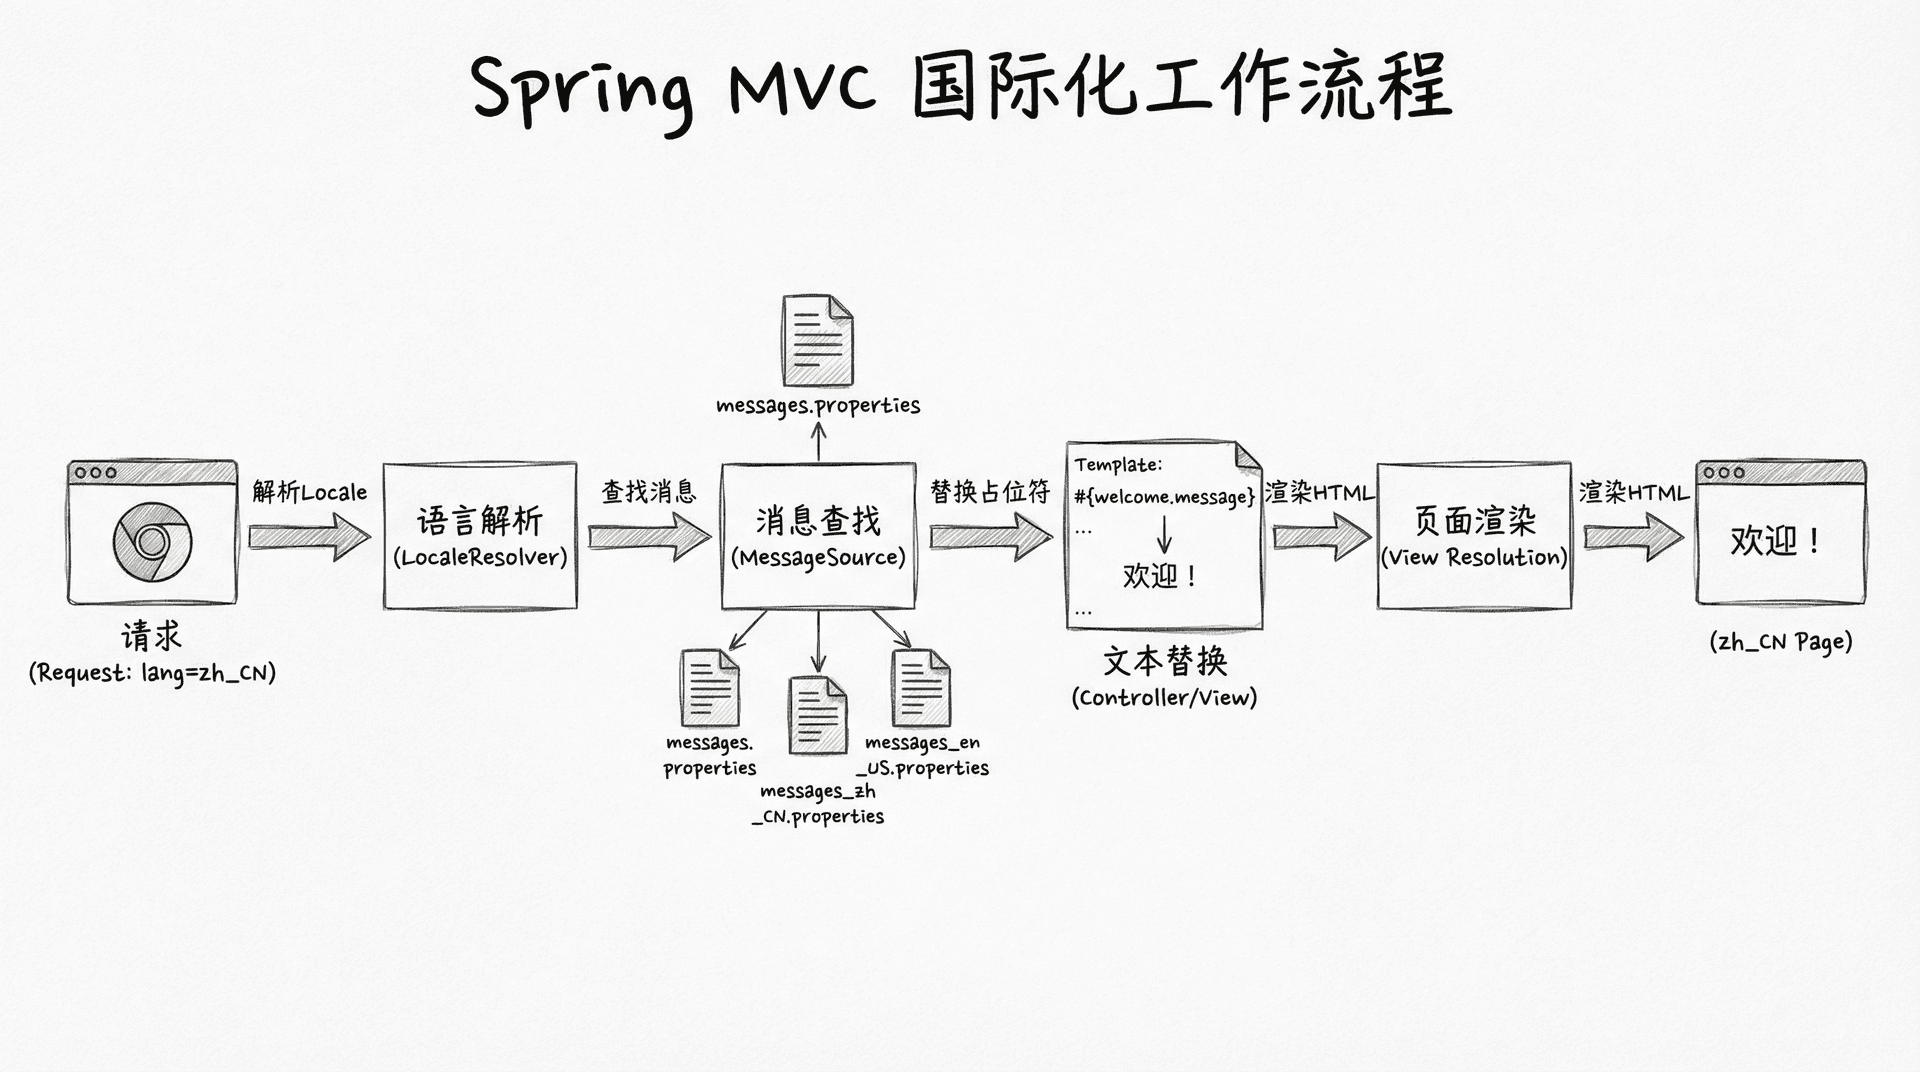
实现国际化支持
国际化(i18n)让应用能够支持多种语言,根据用户的语言偏好显示不同的文本。Spring MVC提供了完整的国际化支持,包括消息源配置、语言解析器、语言切换等功能。
在src/main/resources目录下创建国际化消息文件。创建messages.properties(默认语言,通常是英语或中文):
properties
course.list.title=课程列表
course.create.title=创建课程
course.edit.title=编辑课程
course.form.title.label=课程标题
course.form.description.label=课程描述
course.form.category.label=分类
course.form.difficulty.label=难度级别
course.form.submit.create=创建课程
course.form.submit.update=更新课程
course.form.cancel=取消创建messages_en.properties(英语):
properties
course.list.title=Course List
course.create.title=Create Course
course.edit.title=Edit Course
course.form.title.label=Course Title
course.form.description.label=Description
course.form.category.label=Category
course.form.difficulty.label=Difficulty Level
course.form.submit.create=Create Course
course.form.submit.update=Update Course
course.form.cancel=Cancel在application.properties中配置消息源:
properties
spring.messages.basename=messages
spring.messages.encoding=UTF-8
spring.messages.cache-duration=3600在WebMvcConfig中配置语言解析器:
java
@Bean
public LocaleResolver localeResolver() {
    SessionLocaleResolver resolver = new SessionLocaleResolver();
    resolver.setDefaultLocale(Locale.SIMPLIFIED_CHINESE);
    return resolver;
}

@Bean
public LocaleChangeInterceptor localeChangeInterceptor() {
    LocaleChangeInterceptor interceptor = new LocaleChangeInterceptor();
    interceptor.setParamName("lang");
    return interceptor;
}
SessionLocaleResolver将语言偏好存储在会话中,LocaleChangeInterceptor拦截请求参数lang来切换语言。在模板中使用国际化消息:
html
<h1 th:text="#{course.list.title}">课程列表</h1>
<label th:text="#{course.form.title.label}">课程标题</label>#{course.list.title}是Thymeleaf的消息表达式,它会根据当前语言从对应的消息文件中查找键值。用户可以通过在URL中添加?lang=en参数来切换语言。
优化视图性能
随着应用的发展,视图可能会变得越来越复杂,包含大量的数据绑定和条件渲染。Thymeleaf提供了缓存机制来优化性能,但你需要正确配置才能发挥其作用。
在application.properties中配置Thymeleaf缓存:
properties
spring.thymeleaf.cache=true
spring.thymeleaf.prefix=classpath:/templates/
spring.thymeleaf.suffix=.html
spring.thymeleaf.mode=HTML
spring.thymeleaf.encoding=UTF-8在生产环境中,spring.thymeleaf.cache=true会启用模板缓存,避免每次请求都重新解析模板。在开发环境中,应该设置为false以便看到模板的实时变化。
对于包含大量数据的列表页面,可以考虑使用分页来减少单次加载的数据量。Thymeleaf与Spring Data的分页功能完美集成:
html
<div th:if="${coursePage.totalPages > 1}">
    <a th:href="@{/courses(page=${coursePage.number - 1})}"
       th:if="${coursePage.hasPrevious()}">上一页</a>
    <span th:text="${coursePage.number + 1} + ' / ' + ${coursePage.totalPages}">1 / 10</span>
    <a th:href="@{/courses(page=${coursePage.number + 1})}"
       th:if="${coursePage.hasNext()}">下一页</a>
</
@{/courses(page=${coursePage.number - 1})}是Thymeleaf的URL表达式,它会自动构建URL并处理参数。这种方式让分页导航的实现变得非常简单。
Thymeleaf模板缓存是提高性能的重要手段,但在开发阶段应该禁用缓存以便实时看到模板变化。Spring Boot的Profile机制让你能够为不同环境配置不同的缓存策略,开发环境禁用缓存,生产环境启用缓存。
小结
通过这部分的学习,你应该已经迈出了用Spring MVC打造现代Web应用的重要一步。无论是用Thymeleaf模板渲染丰富的动态页面,还是优雅处理表单、文件上传、内容协商,以及实现拦截器和国际化支持,这些实用技能都将帮助你开发出既强大又易用、让用户满意的Web系统。
下部分,我们将一起探索响应式编程的精彩世界,学习Project Reactor和Spring WebFlux,让你能够轻松应对高并发和异步场景!